

Have you ever wondered how to put on a class play during the holiday season that would be easy for you, have a good part for every child in the class, and that parents, administrators, and children would LOVE? Well this is it: The Gingerbread Man is the perfect play for the early childhood classroom in public schools, especially if you need to avoid topics related to specific religious holidays (such as Christmas- sniff!) and go with a more general holiday theme (if you know what I mean!) This post also has a free download for a cute little Gingerbread House card download, and also a downloadable project to make an angel out of a paper plate. Enjoy!
Each December, my class is busy, busy, busy, getting ready for our annual Gingerbread Man play, and while it is always extra work, it does provide some extra focus and fun for both me and the children during this busy time. Also, the special events do pull in some extra volunteers, and I always appreciate that, because this is definitely the season of “every man for himself” as far as volunteers are concerned! Sometimes in December, barely anyone shows up to help at all! But as we are getting closer to showtime, parents start to come out to help a bit more- THANK GOODNESS!!!! 
If you are still working, then I hope you make it through your week with a smile on your face and a song in your heart. If you are not, enjoy your well deserved rest!


I originally saw this cute little Gingerbread House card in the Family Fun magazine, so I thought I would try it myself! I saved the article that I tore out of the magazine, the directions that they posted under for the card are clearly for some other project! So I just came up with my own template for it. It was very simple to figure out, and I am posting it here for you. All of the credit for this cute idea, though, should go to the good folks at Family Fun magazine, of course! My template is designed to be placed on the fold of a file folder, though, because the tracer itself is too large to fit on an 8.5 x 11″ piece of paper. So just be aware that when you download it and it looks like half of a house, there is a reason for that!
My kids really enjoyed making these cards, but that’s no surprise considering that there were plenty of stickers involved! I did have the houses traced and folded ahead of time by volunteers, and I think that this was essential to the success of the project. I also had volunteers count up the correct amount of stickers for each child and put them into baggies for each child, so that I could control how many each child would get, and that really helped a lot.

Once all of that was done, the only thing that the children had to do was cut the house out on the lines and add the stickers where they wanted them. The next day, I had them write, “Merry Christmas! Love, _____” on the paper that went on the inside and had a volunteer glue that paper inside the card later. The cards are going to be stapled on to the paper bags that we decorated to use as wrapping paper for those clay snowmen that we made last week.

I originally got this art project from my mother’s teacher files, which I inherited from her when she retired! I have always been grateful for the treasures in that file cabinet! So today, all of the credit for this cute little project should go to my “Mommy Dear!”
To prepare this angel, you will need somebody to trace and cut out the plates ahead of time for the children, because I know that Kindergartners, (at least!) will not be able to cut through the paper plates well enough to make them look like anything remotely angelic! Then use a hole punch to make a hole in the top of the head. Each child will also need a four or five inch piece of gold pipe cleaner to loop through this hole. This will form a halo for the angel and will also be a hanger for the angel if families would like to use it as an ornament. You will also need a half of a paper doily per child, and this half should be cut in half again, into fourths. These are for the wings. Ideally, the children are supposed to fold each wing in half before gluing it onto the back of the angel, but most of the children forgot to do this and they turned out just fine.

To make the angel, the children should draw on the face and hair with whatever colors they choose, and then glue the doilies onto the back of the plate for the wings. Then, I chose to have the children sponge paint it the front of the plate for some color. Then, because we were studying magnets in science, I thought that the children could do some magnet marble painting over the top of the sponge paint as well! The result was prettier on some of the angels than on others, depending on how much paint the children used and how they chose to spread it on. But they certainly enjoyed it!
To finish it off, I let them cover their angels with some blue glitter. We made a wonderful, sparkly mess! It was a good thing that my volunteers all came this week- phew! They even helped me hang all of these wonderful angels in my classroom tree!
My wonderful husband cleaned up the template so that I could post it here for you today.

Expanding The Gingerbread Man Play to Include More Children
We are working on our annual holiday program, and the children are INCREDIBLY excited! I haven’t had a “cast” this good in a really long time! It seems that ALL of the children just love to sing all of the songs, and are singing their little hearts out every single day, and it has been such a lot of fun! There is no doubt that putting on a play can be extra work and extra stress, but when I see the children having such a wonderful time, it seems to make it all worthwhile.

This little Gingerbread Man book is a WONDERFUL way to introduce the play to the children, because this version is about a class full of children acting out the story of the Gingerbread Man! This is a read along, sing along book that goes right along with our play and works GREAT in a listening center! The whole thing takes about 12 minutes to listen to from start to finish. 

One thing that I absolutely LOVE about putting on class plays is making them so that everyone gets a part! When I wrote my very first play, The Gingerbread Man, I never imagined that I could expand it to include a part for every one of my children. And indeed, at the time, I had more than thirty children, so I might not have been able to pull it off. But now with twenty-four children, I can indeed do it, and last year when I had 28, I did it as well!

This is how I do it: Originally when I wrote the play, it had an old man, an old woman, a little boy, a little girl, 3 farmers, 3 bears, a fox, and the Gingerbread Man. In the play, first the family chases the cookie, then the farmers chase him, then the bears chase him, and last of all, the fox chases him.

To expand the play, I simply added an extra farmer, an extra bear, and then I added a group of four bunnies to chase the Gingerbread Man and simply played the “Lookie, Lookie, Here’s a Cookie” song and “The Gingerbread Man’s Refrain” an extra time so that they could chase him. Then I added a “Santa group” and did the same thing with them so that they could have a chance to sing that song and chase the Gingerbread Man as well. The Santa group included Santa, Mrs. Claus, two reindeer, and two elves.

I added these characters to the cast to make sure I had a part for every single child. We had Santa, Mrs. Santa, two elves, and two reindeer. They all chased the Gingerbread Man as he ran by, just like the bears, the farmers, and the fox. The very short elf was a three year old sibling of the Gingerbread Man who was something of our “class mascot,” so we put her in the play! LOL! Her big brother was the Gingerbread Man, and you can see her standing right next to him in the class photo above. She didn’t want to leave him. It was so cute!

On Thursday this week I had a parent helper put each child into his or her costume and take a picture of each one of them. The children were so ecstatically excited that they could hardly contain themselves, and were just about INSISTING on rehearsing the play in costume as well! It didn’t matter to them that we would all have to change BACK INTO THEIR COSTUMES to do this, nor that it was already lunch time. It didn’t matter later that it was time to go home, either! Nothing mattered except that they wanted to run through the play with their costumes on! Well, they will just have to wait, and that’s all there is to it!

I do hope that all of their parents bring them back to perform on the evening of the play. It’s terrible for the children when their parents forget to bring them back, or simply just choose not to bring them back. The next day, the children really don’t even know that they missed it; they think it is still coming, and keep asking when the show is, poor little things. Other parents sometimes arrive so late with their children that they miss the whole thing! That really doesn’t take much, because the play only takes about 20 minutes or less from beginning to end. So if a family arrives “just a little bit late,” that is often enough to cause them to miss the entire thing, which results in a broken hearted child. I think that if they had any idea what an incredibly special event it is to their child, they would never do that to them.

For those of you that are curious about the costumes, here are some notes on how I made them or got them. When I first started doing class plays, our PTA wanted to encourage the teachers to put on shows, so they promised each teacher $150 to reimburse them for out of pocket expenses for a new production, and $100 to reimburse for adding to an existing production, so that really helped. In any case, the costumes were constructed and accumulated slowly over the years, and a few of them were made by my former team mate that sadly passed away about six years ago. We used to divide up the responsibilities in the classroom that we shared so that we could get things done. Later, when I knew I was going to do a new play, I would get all of the costumes together in the summer time and then save them for later in the year. That’s the most sane way to do it!

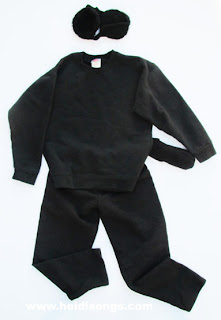
Anyway, most of them are simply a sweatsuit with a hat and a sock tail. The Gingerbread Man’s costume was a white sweatsuit that had to be dyed to a Gingerbread-y color, and then we originally glued on the rick-rack. It fell off after a couple of years after it was washed, and a parent volunteered to sew it back on, thankfully! Then I just pin on the pom-poms so that they can be removed for washing.

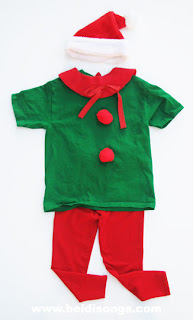
The fox’s costume is a red blanket sleeper with a hat and a sock tail. Santa’s beard was made by a different team mate. She purchased a child’s costume that was a Santa cape, and then made a beard out of a white bib and some cotton balls! The elf’s costume is just red leggings, a green t-shirt, and a round felt collar! No sewing needed! I pinned on the ribbon bow and I bought the smallest Santa cap I could find when they went on sale for half price.
The reindeer’s costume is just a brown sweatsuit with a sock tail pinned on, and some headband reindeer ears that I purchased one year AFTER Christmas when they went on sale. And the bunny is wearing an old pink blanket sleeper that my own children used to wear when they were little! Then I pinned on some cotton balls that were glued together for a tail, and gave her a head band with bunny ears that I once again got on sale AFTER Easter last spring!

Mrs. Claus’ costume was simply a holiday dress that was a little girl had one year when we wanted to cast her as Mrs. Claus. Her mother said that she thought it would work. Then we added the cap to the costume; I think perhaps her mother made it for us. After the show, her mother said that when she outgrew the costume, she would donate it to our play! It’s not so bad when you plan ahead. 
There are a few more costume photos below to check out, if you wish!


————


