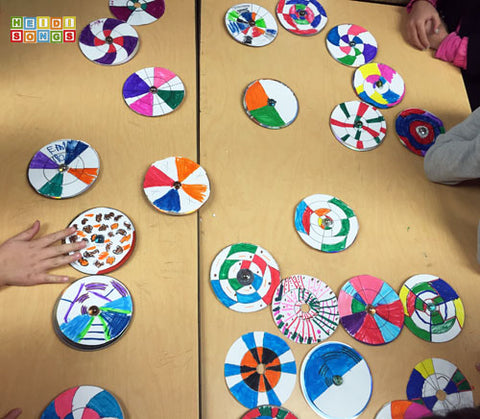
Today I am going to tell you how your kids can make a fun and easy optical illusion spinning top out of just an old CD disk, a marble, and one of our free downloads! This was a really fun science lesson for my first and second graders! We actually did it with our fifth grade buddies, but it would have been easy enough for them to do by themselves with just a little more prep work. The kids ABSOLUTELY LOVED THIS and I highly recommend it! I was really thrilled with the way it came out!
As with most great ideas these days, I found it on Pinterest and then took it from there! I saw this post from the blogger, “All For the Boys” and followed the link. Once I clicked on her YouTube link, I saw that there were MANY ways to make this type of spinning top, and you didn’t HAVE to melt a penny into the middle of the CD to make a handle. It looked like the easiest way to do it was to hot glue a marble into the middle of the CD. But I was still skeptical. Would this really work? Would I need specific CD’s, or specially sized marbles?
It turns out that NO! You do NOT need special disks or marbles! I tried it first with a couple of blank DVD disks I had on hand. (Guess where I got them? LOL!) I used my glue gun to glue the marble in. Only a tiny bit of marble was sticking out of the bottom of the disk. I let it dry and cool for a moment, and then gave it a spin and O… M…. G!!!! It just spun and spun and spun and spun and SPUN!!! JUST. LIKE. THAT!

Then I was hooked! We HAD to try this! I started looking for downloadable templates for the kids to color. I didn’t want them to just cut it out and glue it on… how boring would that be? I was quite surprised that I just couldn’t find any! So after searching for about thirty minutes, I just decided to make my own. Thank goodness I learned to draw using Adobe Illustrator! Hooray! You can download them here.

Here’s how to make these wonderful optical illusion spinning tops with your class.
To Prepare:
1. Get some disks. They could be CDs, DVDs, or games, as long as they are the same size as the template, which is 4.7 inches diameter (120 mm.) I sent a note home with my kids asking for old disks and got TONS! Our big buddies also brought them in, too.
2. Get some marbles! I already had some, and they came from the dollar store.
3. Glue the marbles in using a hot glue gun or any other kind of glue that will hold it securely. We did have some trouble with the marbles falling out, so keep your glue handy during this activity, or have extra disks prepared. If the kids push down hard on the disk, the marble will pop out. That’s the problem! Show them not to do that ahead of time. Make sure that no glue drips down to the bottom of the marble, or the disk will not spin well.

4. Print out the disk templates and cut them apart so that the kids can each take just one, since there are two per page. I printed out enough so that each child could make two or three different ones.
5. If you will not be working with big buddies, then it’s a good idea to pre-cut the center circle for the children. If you cut the circle out just a little smaller than the marble, then it fits right around the top of the marble and you will not need to glue the paper template down. The children that cut the hole too large had to glue the paper down onto the disk, and therefore could only make one optical illusion spinner top. The rest were able to just LAY the paper down on the CD around the marble. Then they switched the templates in and out to use the same disk and marble set over and over!
6. Markers seem to work best as far as coloring the optical illusion is concerned, so if you have any markers, get them out!

To Make the Tops:
Just give the children the prepared disks with the marbles glued in, and the paper templates, and the markers. Have them cut out the disks and then color them anyway they wish! Encourage them to leave some white spaces on the disks, preferably in a pattern! If the eye does not pick up any white, the optical illusion does not “happen.”
Interestingly enough, my kids all started with the templates that had preprinted designs, and then quickly moved to the blank templates to make their own designs. I was really glad that they did! It was a much more creative activity that way!

I also want to point out that once the children have the idea of how this works, they really don’t even need a template. All they need to do is get a piece of paper, trace around the edges of an old disk, cut the paper out, and then place it on the disk to see what it looks like! FUN!
We REALLY liked what it looked like when the whole class brought their spinner tops over to the same table and they all spun them at the very same time as in the video below. It was SO COOL!
I hope that you love this activity as much as I did! Let me know if you have any questions!
Heidi
—————————————————————————————————–


