Teaching children to make snowmen out of clay is really not that hard! Here are step by step instructions on how to make kiln fired clay snowmen with children as young as four or five years old in small groups.

You will need access to a kiln and about ten to fifteen pounds of white clay for a class of twenty-four children. (Do not buy the red clay for white snowmen!) You will also need at least one week for the snowmen to dry before they can be fired in the kiln, and then another day to glaze them in the classroom before they can be fired again. So the absolute minimum amount of time needed to complete this clay project is a week and a half, but it can be completed more comfortably in two weeks. I always try to give myself a month, just so that if anyone is absent on the day that we make the clay project, I have a few days to make it up, and then plenty of the “wiggle room” I always need to find the time to get the snowmen loaded and unloaded in the kiln. At my school, we also have to take into account that there may be other teachers using the kiln as well, so it’s best not to put things like this off til the last minute.

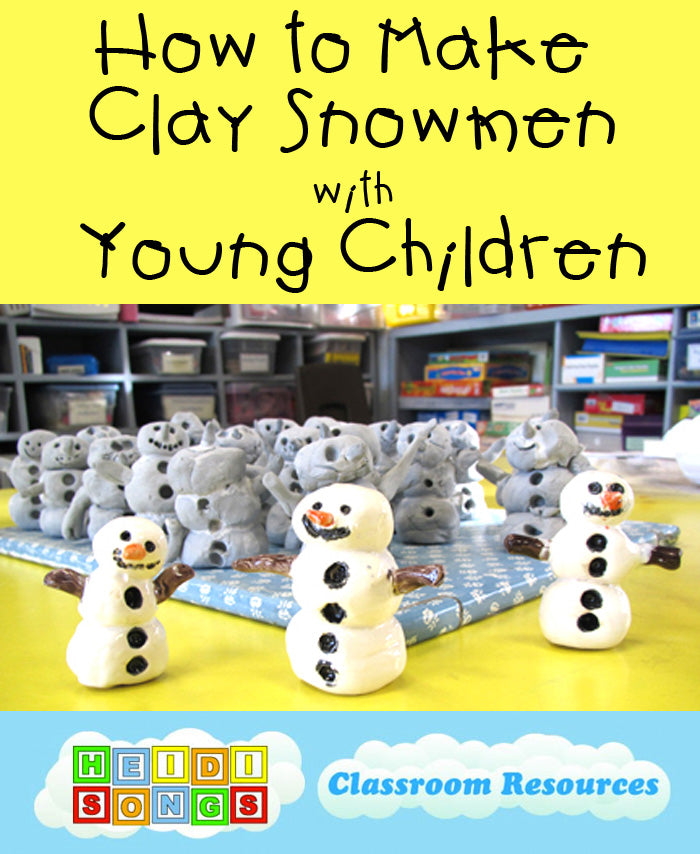
The snowmen in the picture above the title for this section are my teacher made samples. The snowmen in the picture to the left that are still to be glazed are strictly child made, and I think you can really see the difference. I think that the child made ones are really adorable! The snowmen below with the hats on them were made by the class next door. They have a retired teacher come in and do them with the children one at a time. You can see that these snowmen have had a LOT more adult intervention, and they all tend to come out looking the same. In fact, it is hard to tell that a child ever laid hands on them, in my opinion! I really respect this particular retired teacher, but she and I do not share the same opinion about children’s artwork, and especially about clay projects. I really want my students’ gifts of clay artwork to look like their work at the age of five, not the teacher’s work when they were five. The fact that the child made it him or herself is what makes the gift special, and I believe that it should be treasured as such! Behind the three finished sample snowmen that I made, you can see the whole class’ snowmen, ready to be fired.

To begin, all you have to do is just have the kids roll three balls of clay, and then have them line them up by size, choosing the largest for the bottom of the snowman. The smallest is for the head, and the medium sized one is for the middle. The bottom of the snowman should be about the size of a golf ball, and the middle should be about the size of a ping pong ball. The head should be slightly smaller than the ping pong ball, and maybe a bit larger than a marble shooter. You have to show the kids how to score the clay and then put on the slip (slip is a little clay mixed with water. I tell the kids that it is “wet clay” that acts like glue). For those of you that are unfamiliar with the word “scoring,” in reference to clay, this is what it is: when you score the clay, all you have to do is scratch it up and make it a little rough. I usually tell them to make a Tic Tac Toe board on it! I also show them how two balls of clay without the scoring and slip fall apart very easily, but two balls of clay that have been scored and have slip between then stick together pretty well.
So, the children score the clay and put the slip between all of the balls of clay. Then they use the fat eraser side of a pencil to poke holes in the sides of the snowman for the arms. (The arm holes only need to be about 1/4 inch long.) Then they roll some primary pencil sized “snakes” for the arms and put some slip inside the arm holes. Then they put the arms inside the arm holes. The arms should be no longer than an inch or two, and about the width of a fat primary pencil. Then they use the sharpened side of a pencil to make the snowman’s face. They use the eraser side for the buttons. If you want to add a hat, then they need to roll out another ball of clay, and then squish it flat with the palm of their hand, but no thinner than 1/4 of an inch or it will be too fragile. Score it and add some slip, and do the same to the head, and then put it on the snowman’s head. That will be the brim of the hat. Then add another ball of clay to the top of the flattened clay, and that will form the “stove-pipe” part of the top of the hat. Of course, that has to be scored and it needs slip in order for it to stick.

We usually put the snowman’s nose on for the children, because it has to be small and delicate. You have to make a hole with the sharpened pencil side of a pencil, and then add some slip to the hole. Then make a tiny little nose out of a leftover piece of clay, and stick it in the hole. Caution: warn the kids that most of the noses will break. That’s just life. One little tip over in the kiln or anywhere else, and that little nose will break right off!
Here are another couple of tips. I NEVER let them scratch their names into the bottom of the snowman, because very often they push too hard and ruin the whole thing by squishing it and have to start over. If you don’t have time to get to everybody, have them write their names on a paper towel, and have them leave their snowmen on the paper towel with their name on it.
I ALWAYS make a couple of extra snowmen, and I just scratch an X lightly on the bottom. Somebody’s snowman will probably break in the kiln, and somebody is going to be heartbroken. All it takes is one little air bubble inside the middle of one snowman, and that air will expand and the snowman will explode in the kiln! BUT… I can usually substitute my snowman for theirs and just tell them that their name got rubbed off, and they never know. Also, if you get a new student, there will be a snowman for that child when it’s time to glaze them. By the way, if your snowmen seem large and heavy to you, and you are afraid that they might have air bubbles or something like that in them, you can always stick the fat eraser side of a pencil up the bottom of the middle of the snowman to help it dry. BUT, this must be done while they are still wet, of course. Hint: if you make 24 snowmen out of ten pounds of clay, then they will probably dry just fine without the extra hole in the bottom middle. If your snowmen are a lot bigger than that, then you may need to poke that extra hole in them to help them dry. Watch out for the names, though! You’ll have to write the names in the bottom of the snowmen going around the edges of them rather than across the middle.
The snowmen have to air dry for about a week before going into the kiln to be fired at Cone 4. Then they have to be glazed, and we usually fire them at Cone 5 or 6, depending on the glaze. If you are not sure, just look at the bottle of glaze and it will tell you what temperature to fire them at. I always go with the higher of the temperatures. Of course, they can’t be glazed on the bottom of the snowmen, or they stick to the kiln and you have to break them to get them off.
I always lay them down flat on their backs in a tub on some dish towels when I am ready to take them over to the kiln, because if one of them tips over when they are standing up, then a whole bunch of them tip over, domino style. They are at their most fragile at this point, when they are ready for their first firing. Also, I always dry them way up high OUT OF REACH of the children, because the temptation to lift them up to read the names and check to see which snowman is theirs is totally overwhelming! They lift them up, touch them, and break them. And sadly, the one they break is almost NEVER theirs! So I put them up on top of a cupboard where nobody, (not even a volunteer,) can easily touch them to investigate.
When we get ready to glaze them, we give them toothpicks to put the black paint into the very tiny holes that they made with the sharp end of the pencil. That works much better than a paintbrush because it is easier to control. I always remind them that the more they cover the whole thing with glaze, the shiner their snowman will be. A thin coat of glaze will result in a barely shiny snowman. Sometimes, I go over their finished, glazed, snowmen with a coat of clear glaze, just to help them wind up shinier!
To wrap our gifts, the children sponge paint a wreath on a white lunch bag, and use a Q-tip to put on holly berries. Then we wrap the snowmen in tissue paper and send them home, with lots of stern reminders about the hazards of stuffing them in their backpacks and then throwing the backpacks on the ground. If possible, I prefer to hand these treasures straight to into the hand of the adult that picks them up after school!
If you decide to make these clay snowmen, I would love to hear from you! Have fun!
Heidi


----------------------------------
Follow me! Did you enjoy this post? Do me a favor and share it with your friends! And follow this blog by signing up for my email updates, or follow on Bloglovin', or follow me on TPT! I'm also on Pinterest, Facebook, Twitter, Instagram, Google+ and YouTube, too! Don't forget to sign up for our email newsletter (at the bottom of this page) for special deals and promo codes that you won't find out about anywhere else.


