As I move into the month of May and closer to the end of the school year, I am always interested to see how far I am able to take some of my little ones that seem ready to progress beyond the basics. So in reading this week, I decided to focus on words with an “ou” spelling pattern in the middle and see how the children could do.
Meanwhile, I am leaving on Friday for the International Reading Association Conference in Orlando, Florida, on a red-eye flight out of LAX! I am really excited to take this trip, and am even taking a couple of extra days to see some sights! Luckily, I have a wonderful retired teacher that subs for me, and I am sure that she will take good care of my class while I am gone. (My principal is also very cooperative about these conferences – thank goodness!) However, now that we are getting so close to the end of the year, my students are getting a bit rowdy, so I’ll keep my fingers crossed that I don’t have too much trouble “getting them back” when I get back into town next week. They are normally a sweet, but lively group, and quite talkative, so it might take some work! Let’s hope I don’t regret this trip completely!
1. Word Family of the Week Chart, and a Great Little Game
I have used this neat little pocket chart from Really Good Stuff each year since I got it about five years ago! I just stapled it up to the wall next to my calendar, and now we read it in the morning after our flag salute and calendar routine. On Monday after lunch this week, I also passed out dry erase boards, and played a little game with the children. I sounded out a word from the chart and asked them to think which word it might be, and write it down. I didn’t say the word; I only sounded it out slowly. That meant that the children had to think about all of the sounds that they heard and blend them together. Then they had to think about the sounds and write them down. I also gave them a hint as to what word it might be. For example, if the word was “pound,” I might say “This is the place where the dog catcher might take a stray dog.” I would still say that, because I was using the harder words from the “ou” word family, such as “found” and “count,” the bottom quarter of my class was still “guessing” at the word and what to write, but the rest of the class was following along just fine. So far, this seems like a very worthwhile activity, but I am VERY tired of the constant complaints about dry erase markers that don’t work, so I think that next time we do it, we’ll simply write our words in our journals with a pencil!
2. Another Fun Game: Count Around!
I mentioned this game already in a blog entry last August on Whole Group Games, but this is a great time of year to try it, so I thought I would give it a whirl this week. The kids LOVED it! And it really was a wonderful way to get them excited about counting past 100.
In this game, the children all stand in a big circle. Then you have one person begin the counting with number one. The person next to him or her says “two,” and the person after that says, “three,” etc. Each person that says a “Zero Hero Number” (any number that is a multiple of ten) is out and must sit down right where he or she is in the circle. The others continue counting around that child. Because I do have 28 students in my class, we made it all the way up to around 230 before our last student was out. It was interesting to watch the children struggle to continue counting those unfamiliar numbers past 100! It seems so obvious to us that if the number that comes after 78 is 80, then the number that comes after 179 would be 180. But this is beyond the experience of most of the children, so it is all brand new. All of the children but one were good sports about being “out” of the game when that happened to them, and there was a lot of cheering for the winner. All in all, I thought that it was a wonderfully worthwhile game to play, and even though it was tough to keep some of them quietly listening after they were out, most of them did really well. That’s not bad for the last fifteen minutes of the day!
3. We Love the “Says” Song! (Plus Some Tips On Using Sing and Spell More Effectively)
There’s something about this song that the kids just LOVE, so I thought I would share this little video clip with you. Even though it is shot from the perspective of the back of the children, you can just hear, see, and feel how excited they are about this song! It is from Sing and Spell Volume Five. You may want to notice that I have the word card in my hand, and I try to keep holding it so that the children can see it while I do the motions. I also try to remember to ask them what the word is both before and after the song plays. Later, we will write the word as the song plays either on paper or on dry erase boards. This helps transfer what they have learned in song to paper. It’s interesting to watch this happen, because you can see right away which children have misunderstood the lyrics or letters as they have sung them, because they will appear wrong on their boards or papers. Others will have no idea at all what to write, and will be trying to copy others’ work. In that case, I’ll work on this in small groups, singing the songs s-l-o-w-l-y with the children in these lower functioning groups, and helping them try to write the letters and see the connection between the words and the songs. This is something that usually is needed more towards the beginning of the year in Kindergarten, though.
We are just beginning our unit on zoo animals, so I will probably have them write a little book on what each animal says so that they can use their word. Using the word in a writing assignment always cements the concept in the brain and makes it stick! It really is a vitally important part of the “Sing and Spell” learning process. So I would highly suggest that you be on the lookout for “predictable book” types of patterns that include the words that you need your students to work on. That way, they could use them to write their own little books.
4. Sounds Fun Worksheets: Free Download!
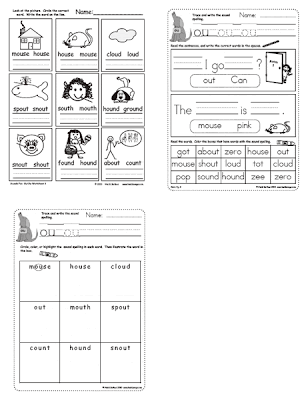
One of my goals has also been to create a set of worksheets that could go along with the Sounds Fun cards, so I decided to try to create a few of these to try out, and then share them with you here today. I am trying to make them a combination of the CVC book worksheets format, and the Sing and Spell Workbooks format. Maybe some of you can give me some feedback on whether or not these types of worksheets are effective or useful (or not)! And if not, what could be done better? That way, as I develop them, I can create the best possible product that will truly meet the needs of as many students as possible. In any case, I would appreciate any feedback that you care to give! Just leave a comment on the blog or on the HeidiSongs Facebook Page. Thanks!
I do plan on including some like the long vowel chick worksheet I gave away on my blog last week. I definitely want to include some more “fun” formats, (like maybe the “Secret Code” type?) so if you know of any other types that the kids really like, please let me know by posting a comment below. That way, I can try to imitate the format and then give it my own style.
5. Community Helpers!
We finished up our unit on Community Helpers just in time for Open House, which will be on May 19th. I worked hard over the last couple of weeks to get my bulletin boards up so that I could be gone this next week for the conference in Orlando, and then make it back just in time for the week of Open House. To decorate, I took some of the designs from KinderLit’s “Oh, What Can I Be?” book, which is a flip book that uses photos of the children’s faces for the heads of the people. I didn’t want to fiddle with trying to get photos scaled to exactly the right size, because I had done that last year for a similar weather book and never was happy with the results, even though I spent three hours on Photoshop tweaking those photos! So I just had them add the heads with paper, and then created my own hats to go with each one. I LOVE their designs! The only caveat I would say is that I often find that I have to fill in the gaps a bit with their instructions. For example, for the 13 Community Helpers in their book, there are just two pages of instructions. The cutting dimensions are included for the chest, pants, and boots. There are never any tracing patterns included, since they just don’t do things this way. You must figure out all of the other details yourself, the instructions being to “Add details from paper scraps, stickers, clip art, or magazine pictures.” The designs themselves are definitely top notch! It just takes time to figure out how you will do it and what sizes you will be cutting out all of those “scraps.”
Now I know that the gals at Kinderlit are really very successful (and extremely nice people!), so I know that their items must work beautifully for many people! The difficulties I have with this sort of thing probably arise more from my own need to be something of a control freak! Or maybe it was just that I really wanted to have these projects turn out well because they were to go up for Open House due to my own vanity? It’s just that I really can’t imagine handing a child a bucket of paper scraps, dumping them out on the table, and telling them to make a fireman out of them- and then expecting them to come up with anything recognizable! Let’s face it- I had trouble coming up with something recognizable, and I’m an adult! But I must confess that I really haven’t had the courage to try it. Maybe that’s just my own lack of courage and faith in my own little ones talking, though.
The fire fighter cutting directions I finally came up on my own, based on their designs, had eleven different sized pieces of paper to cut, plus the hat that I drew myself and xeroxed for the children because I couldn’t seem to make something out of rounded rectangles that resembled a fireman’s hat. Just as an example, of those eleven pieces, six of them needed to be doubled because each child had to have two, such as arms, legs, etc. In the end, there were so many pieces that I decided that I would make it a two day project, so we did the body on the first day, and the details such as stripes, etc., on the second day. Again, I really do LOVE their designs, and I own and use a lot of their things each year. But when I consider whether or not I want to try something, I always remind myself that the directions will probably take some tweaking on my part to make me, (at least,) happy.
Now for the vehicles, I started off using the patterns from the “Things That Go” book from TLC Lessons. The directions given by TLC are easier to follow, in my opinion, because they are more complete. I was able to just follow the cutting directions and make the police car in the book without much extra intervention on my part. I just simplified one part, because my aide pointed out that it would be easier to glue down one long bumper all the way across the police car and have one long piece of paper to deal with than two small ones that were easier to lose and get mixed up with the hub caps, etc. The only thing was that the car as it was designed as incredibly small compared to my existing “helpers,” so I had to double it in size so they could go together. That worked out fine! The only thing is that I wasn’t crazy about the fire engine in her book, and that was the last Community Helper vehicle in there that I needed. So I wound up making the rest myself! I’ll probably post them for sale sometime this summer when I find the time, because they were WAY too much work to give away! I love the way it all turned out, though!


